Step 1: Express Setup
প্রথমে Express.js সেটআপ করব।
- একটি নতুন প্রোজেক্ট তৈরি করুন এবং প্রয়োজনীয় প্যাকেজগুলো ইনস্টল করুন:
mkdir backend
cd backend
npm init -y
npm install express body-parser
Backend/
│
├── src/
│   ├── config/
│   │   └── passport.js
│   │   └── database.js
│   ├── controllers/
│   │   └── authController.js
│   ├── entities/
│   │   └── User.js
│   ├── routes/
│   │   └── authRoutes.js
│   ├── utils/
│   │   └── sendEmail.js
│   └── index.js
├── .env
├── package.json
└── README.md
Step 2: Basic Express Setup
প্রথমে আমাদের Express.js সেটআপ করা দরকার। src/index.js ফাইল তৈরি করুন এবং নিচের কোড লিখুন:
// src/index.js
const express = require('express');

const app = express();

// Middleware সেটআপ
app.use(bodyParser.urlencoded({ extended: false }));
app.use(bodyParser.json());

app.get('/', (req, res) => {
    res.send('Hello World!');
});

app.listen(3000, () => {
    console.log('Server is running on port 3000');
});
এই স্টেজে, সার্ভারটি চালিয়ে চেক করতে পারেন:
node src/index.jsStep 3: Database Setup
এখন ডাটাবেজ সেটআপ করব। প্রথমে TypeORM এবং MySQL লাইব্রেরি ইনস্টল করুন:
npm install typeorm reflect-metadata mysql2তারপর src/config/database.js ফাইল তৈরি করুন এবং TypeORM কনফিগারেশন করুন:
//src/config/database.js
require('reflect-metadata');
const { DataSource } = require('typeorm');

const AppDataSource = new DataSource({
    type: 'mysql',
    host: 'localhost',
    port: 3306,
    username: 'root',
    password: '',
    database: 'passportjs_example',
    synchronize: true,
    logging: false,
    entities: [],
    migrations: [],
    subscribers: [],
});

AppDataSource.initialize()
    .then(() => {
        console.log('Data Source has been initialized!');
    })
    .catch((err) => {
        console.error('Error during Data Source initialization:', err);
    });

module.exports = AppDataSource;
for more advance
.env
# Database Information (# MongoDB may not require a username or passsword if not configured.)
DB_TYPE=mysql
DB_HOST=localhost
DB_PORT=3306
DB_USERNAME=root
DB_PASSWORD=
DB_DATABASE=passportjs_example
DB_SYNCHRONIZE=false
DB_LOGGING=false
require('reflect-metadata');
require('dotenv').config(); // Load environment variables

const { DataSource } = require('typeorm');
const path = require('path');

// Import your entities here
const User = require('./entities/User'); // Adjust the path as needed

// Determine the database type from environment variables
const dbType = process.env.DB_TYPE || 'mysql';

// Common configuration options
const commonConfig = {
    synchronize: process.env.DB_SYNCHRONIZE === 'true',
    logging: process.env.DB_LOGGING === 'true',
    entities: [User], // Add your entities here
    migrations: [
        path.join(__dirname, 'migrations/*.js'), // Path to your migration files
    ],
    subscribers: [], // Add your subscribers here or load from a specific file
};

// Conditional configuration based on DB type
const dbConfig = dbType === 'mongodb' ? {
    type: 'mongodb',
    url: `mongodb://${process.env.DB_HOST}:${process.env.DB_PORT}/${process.env.DB_DATABASE}`, // MongoDB connection string
    useNewUrlParser: true, // MongoDB-specific options
    useUnifiedTopology: true, // MongoDB-specific options
} : {
    type: dbType,
    host: process.env.DB_HOST || 'localhost',
    port: parseInt(process.env.DB_PORT, 10) || 3306,
    username: process.env.DB_USERNAME || 'root',
    password: process.env.DB_PASSWORD || '',
    database: process.env.DB_DATABASE || 'passportjs_example',
};

// Initialize Data Source with merged configurations
const AppDataSource = new DataSource({
    ...commonConfig,
    ...dbConfig,
});

AppDataSource.initialize()
    .then(() => {
        console.log('Data Source has been initialized!');
    })
    .catch((err) => {
        console.error('Error during Data Source initialization:', err);
    });

module.exports = AppDataSource;
Step 4: User Entity
// src/entities/User.js
const { EntitySchema } = require('typeorm');

module.exports = new EntitySchema({
    name: 'User',
    tableName: 'users',
    columns: {
        id: {
            type: 'int',
            primary: true,
            generated: true,
        },
        username: {
            type: 'varchar',
            unique: true,
            nullable: true,
        },
        email: {
            type: 'varchar',
            unique: true,
            nullable: true,
        },
        password: {
            type: 'varchar',
            nullable: true,
        },
        phone: {
            type: 'varchar',
            unique: true,
            nullable: true,
        },
        firstName: {
            type: 'varchar',
            nullable: true,
        },
        lastName: {
            type: 'varchar',
            nullable: true,
        },
        isActivated: {
            type: 'boolean',
            default: false,
        },
        googleId: {
            type: 'varchar',
            unique: true,
            nullable: true,
        },
        facebookId: {
            type: 'varchar',
            unique: true,
            nullable: true,
        },
        otp: {
            type: 'varchar',
            nullable: true,
        },
        otpExpires: {
            type: 'timestamp',
            nullable: true,
        },
        activationToken: {
            type: 'varchar',
            nullable: true,
        },
        resetToken: {
            type: 'varchar',
            nullable: true,
        },
        createdAt: {
            type: 'timestamp',
            createDate: true,
        },
        updatedAt: {
            type: 'timestamp',
            updateDate: true,
        },
    },
});
ডাটাবেজ কনফিগারেশনে এন্টিটি যোগ করুন। src/database.js এ নিম্নরূপ পরিবর্তন করুন:
// src/database.js
require('reflect-metadata');
const { DataSource } = require('typeorm');
const User = require('./entities/User');

const AppDataSource = new DataSource({
    type: 'mysql',
    host: 'localhost',
    port: 3306,
    username: 'root',
    password: '',
    database: 'passportjs_example',
    synchronize: true,
    logging: false,
    entities: [User],
    migrations: [],
    subscribers: [],
});

AppDataSource.initialize()
    .then(() => {
        console.log('Data Source has been initialized!');
    })
    .catch((err) => {
        console.error('Error during Data Source initialization:', err);
    });

module.exports = AppDataSource;
Step 5: Registration
প্রথমে bcryptjs n ইনস্টল করুন:
npm install bcryptjs এখন আমরা কন্ট্রোলার তৈরি করব। src/controllers/authController.js ফাইল তৈরি করুন:
const bcrypt = require('bcryptjs');
const AppDataSource = require('../config/database');
const User = require('../entities/User');

const register = async (req, res) => {
    const { username, email, password, phone } = req.body;
    const userRepository = AppDataSource.getRepository(User);

    try {
        const existingUser = await userRepository.findOne({ where: [{ username }, { email }, { phone }] });
        if (existingUser) {
            return res.status(400).json({ message: 'User already exists' });
        }

        const hashedPassword = await bcrypt.hash(password, 10);
        const newUser = new User();
        newUser.username = username;
        newUser.email = email;
        newUser.password = hashedPassword;
        newUser.phone = phone;
        newUser.isActivated = false;

        await userRepository.save(newUser);

        res.status(201).json({ message: 'User registered successfully. Please check your email to activate your account.' });
    } catch (err) {
        res.status(500).json({ message: 'Error registering user', error: err.message });
    }
};


module.exports = { register };
Routes
রাউটগুলি সংজ্ঞায়িত করুন। src/routes/authRoutes.js ফাইল তৈরি করুন:
// src/routes/authRoutes.js
const express = require('express');
const { register  } = require('../controllers/authController');

const router = express.Router();

router.post('/register', register );

module.exports = router;
Main Application
শেষে src/index.js ফাইলটি সম্পূর্ণ করুন:
// src/index.js
const express = require('express');
const bodyParser = require('body-parser');
const authRoutes = require('./routes/authRoutes');

const app = express();

// Middleware সেটআপ
app.use(bodyParser.urlencoded({ extended: false }));
app.use(bodyParser.json());

// Routes সেটআপ
app.use('/auth', authRoutes);

app.get('/', (req, res) => {
    res.send('Home Page');
});

app.listen(3000, () => {
    console.log('Server is running on port 3000');
});
Otp Generation
Add OTP Generation and SMS Sending Utilities
Create a utility to generate OTP and another to send it via SMS.
src/utils/generateOtp.js
const generateOtp = () => {
    return Math.floor(100000 + Math.random() * 900000).toString(); // 6-digit OTP
};

module.exports = generateOtp;
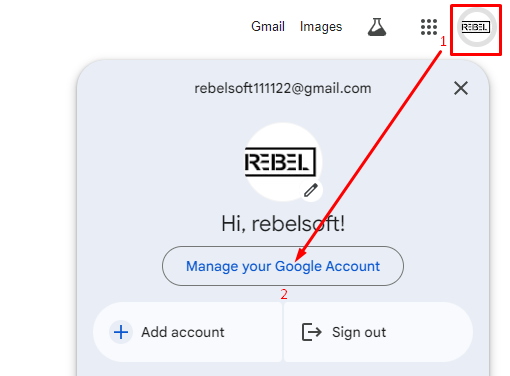
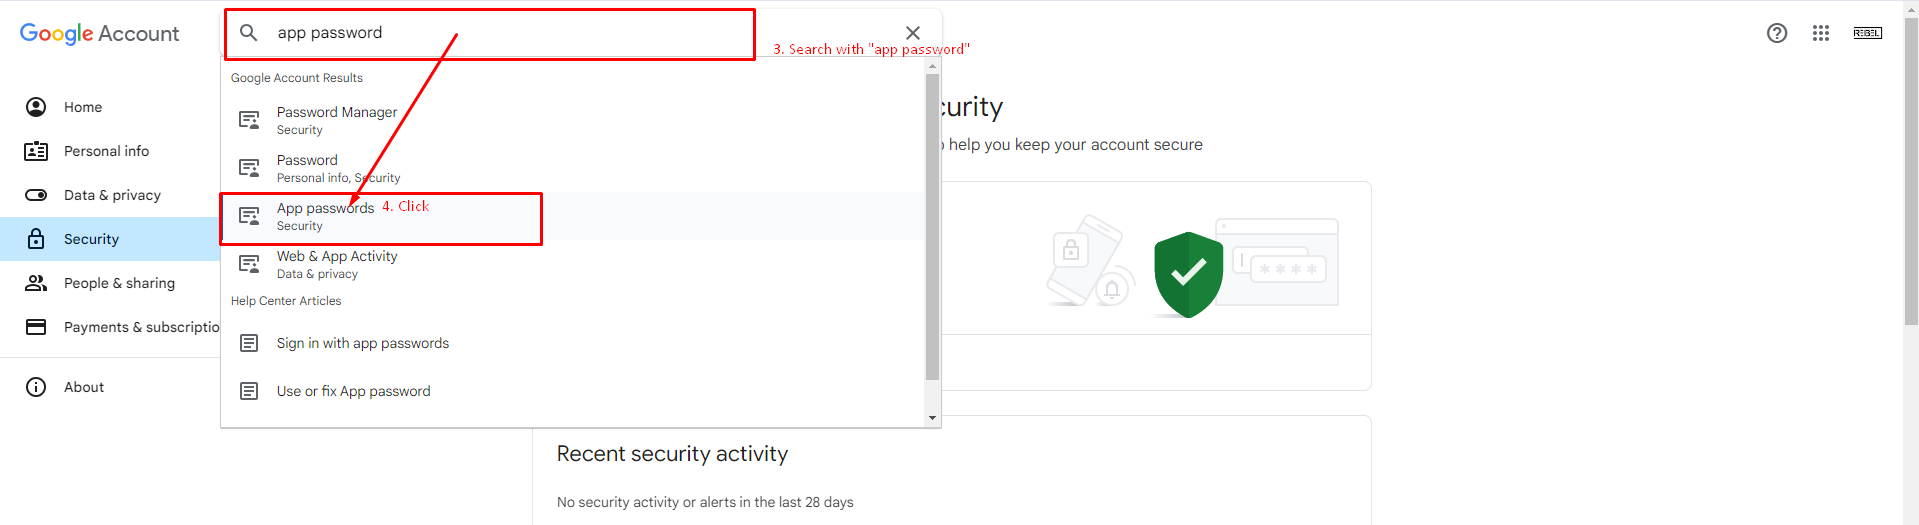
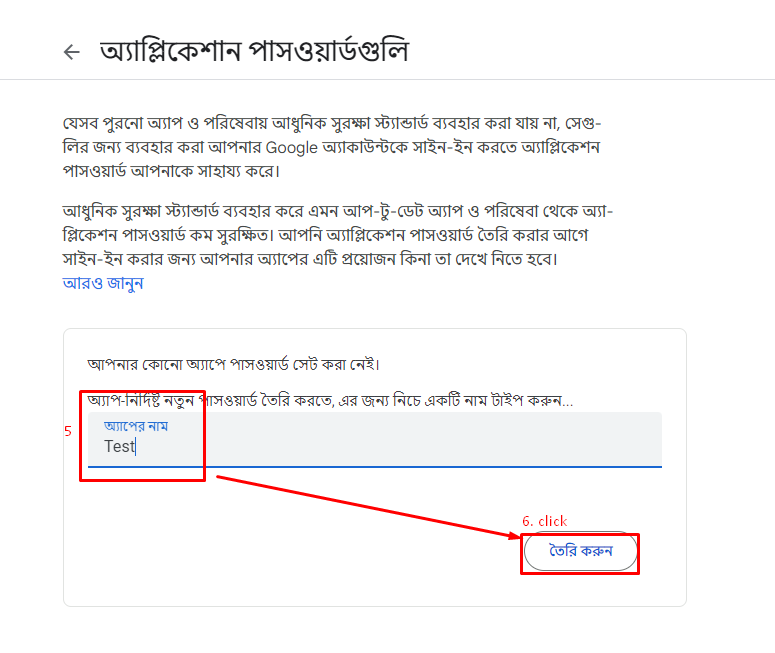
Gmail App Password for sent email

Step 6 : Send Email Setup
ইমেল পাঠানোর জন্য nodemailer ইনস্টল করুন:
npm install nodemailer dotenv.env
# Email service configuration
EMAIL_SERVICE="Gmail"             # Email service provider (e.g., Gmail, Outlook, Yahoo)
EMAIL_USER="rebelsoft111122@gmail.com" # Your email address
EMAIL_PASS="ydsv jsps bexl dyxf" # Your email password or app password

# Email transport options
EMAIL_PORT=465                  # Port for SMTP (typically 465 for SSL, 587 for TLS)
EMAIL_SECURE=true               # Use SSL/TLS (true for port 465, false for port 587)

# Optional settings for additional customization
EMAIL_HOST=smtp.gmail.com       # SMTP host (usually not needed as 'service' is used)
EMAIL_CONNECTION_TIMEOUT=5000   # Connection timeout in milliseconds
EMAIL_MAX_CONNECTIONS=5         # Maximum number of simultaneous connections
// src/utils/sendEmail.js
const nodemailer = require('nodemailer');
require('dotenv').config(); // Ensure environment variables are loaded
/**
* Sends an email using Nodemailer with the provided options.
* @param {Object} options - The email options.
* @param {string} options.to - The recipient's email address.
* @param {string} options.subject - The subject of the email.
* @param {string} options.text - The body text of the email.
*/
const sendEmail = async (options) => {
// Create a Nodemailer transporter using environment variables
const transporter = nodemailer.createTransport({
service: process.env.EMAIL_SERVICE, // Email service from environment variables
auth: {
user: process.env.EMAIL_USER, // Your email address from environment variables
pass: process.env.EMAIL_PASS, // Your email password (or app password) from environment variables
},
port: parseInt(process.env.EMAIL_PORT, 10) || 465, // Port from environment variables, default to 465
secure: process.env.EMAIL_SECURE === 'true', // Secure option (true for port 465, false for port 587)
// Optional settings
connectionTimeout: parseInt(process.env.EMAIL_CONNECTION_TIMEOUT, 10) || 5000, // Connection timeout
maxConnections: parseInt(process.env.EMAIL_MAX_CONNECTIONS, 10) || 5, // Max simultaneous connections
// host: process.env.EMAIL_HOST, // Optionally set host if not using 'service'
});
// Email options
const mailOptions = {
from: process.env.EMAIL_USER, // Sender's email address
to: options.to, // Recipient's email address
subject: options.subject, // Email subject
text: options.text, // Email body text
};
try {
// Send the email
await transporter.sendMail(mailOptions);
console.log('Email sent successfully!');
} catch (error) {
console.error('Error sending email:', error);
}
};
module.exports = sendEmail;
Send activation email otp
install jsonwebtoken
npm install jsonwebtokenAdd the activation link base URL to your .env file:
EMAIL_VERIFICATION_ENABLED=true
OTP_VERIFICATION_ENABLED=true
EMAIL_VERIFY_ACTIVATION_LINK=http://localhost:5000/api/auth/activate
JWT_SECRET=your_jwt_secret
PHONE_VERIFICATION_ENABLED=true
const jwt = require('jsonwebtoken');
const bcrypt = require('bcryptjs');
const AppDataSource = require('../config/database');
const User = require('../entities/User');
const sendEmail = require('../utils/sendEmail');
const generateOtp = require('../utils/generateOtp');

const register = async (req, res) => {
    const { username, email, password, phone } = req.body;
    const userRepository = AppDataSource.getRepository(User);

    try {
        // Check if user already exists
        const existingUser = await userRepository.findOne({ where: [{ username }, { email }, { phone }] });
        if (existingUser) {
            return res.status(400).json({ message: 'ব্যবহারকারী ইতোমধ্যে নিবন্ধিত' });
        }

        // Hash the password
        const hashedPassword = await bcrypt.hash(password, 10);

        // Create a new user instance using the repository's create method
        const newUser = userRepository.create({
            username,
            email,
            password: hashedPassword,
            phone,
            isActivated: false,
        });

        // Save the new user
        await userRepository.save(newUser);

        if (email) {
            // Handle email verification
            if (process.env.EMAIL_VERIFICATION_ENABLED === 'true') {
                if (process.env.OTP_VERIFICATION_ENABLED === 'true') {
                    // Send OTP to email
                    const otp = generateOtp();
                    newUser.otp = otp;
                    await userRepository.save(newUser);

                    try {
                        await sendEmail({
                            to: newUser.email,
                            subject: 'OTP for Registration',
                            text: `Your OTP is ${otp}. Use this code to complete your registration.`,
                        });
                        return res.status(201).json({ message: 'ব্যবহারকারী সফলভাবে নিবন্ধিত। OTP পাঠানো হয়েছে, দয়া করে যাচাই করুন।' });
                    } catch (emailError) {
                        return res.status(500).json({ message: 'ব্যবহারকারী নিবন্ধিত হয়েছে, কিন্তু ইমেল পাঠাতে ব্যর্থ হয়েছে।', error: emailError.message });
                    }
                }
            } else {
                // Default activation
                newUser.isActivated = true;
                await userRepository.save(newUser);
            }
        }

        res.status(201).json({ message: 'ব্যবহারকারী সফলভাবে নিবন্ধিত। প্রয়োজনীয় যাচাই সম্পন্ন করুন।' });
    } catch (err) {
        res.status(500).json({ message: 'ব্যবহারকারী নিবন্ধন করতে ত্রুটি', error: err.message });
    }
};

module.exports = { register };
Sent activation link email
const jwt = require('jsonwebtoken');
const bcrypt = require('bcryptjs');
const AppDataSource = require('../config/database');
const User = require('../entities/User');
const sendEmail = require('../utils/sendEmail');
const generateOtp = require('../utils/generateOtp');

const register = async (req, res) => {
    const { username, email, password, phone } = req.body;
    const userRepository = AppDataSource.getRepository(User);

    try {
        // Check if user already exists
        const existingUser = await userRepository.findOne({ where: [{ username }, { email }, { phone }] });
        if (existingUser) {
            return res.status(400).json({ message: 'ব্যবহারকারী ইতোমধ্যে নিবন্ধিত' });
        }

        // Hash the password
        const hashedPassword = await bcrypt.hash(password, 10);
        const newUser = new User();
        newUser.username = username;
        newUser.email = email;
        newUser.password = hashedPassword;
        newUser.phone = phone;
        newUser.isActivated = false;

        // Save the new user
        await userRepository.save(newUser);

        if (email) {
            // Handle email verification
            if (process.env.EMAIL_VERIFICATION_ENABLED === 'true') {
                if (process.env.OTP_VERIFICATION_ENABLED === 'true') {
                    // Send OTP to email
                    const otp = generateOtp();
                    newUser.otp = otp;
                    await userRepository.save(newUser);

                    await sendEmail({
                        to: newUser.email,
                        subject: 'OTP for Registration',
                        text: `Your OTP is ${otp}. Use this code to complete your registration.`
                    });
                }


               // নতুন যোগ  করা
                else {
                    // Send activation email
                    const token = jwt.sign({ id: newUser.id }, process.env.JWT_SECRET, { expiresIn: '1h' });
                    const activationLink = `${process.env.EMAIL_VERIFY_ACTIVATION_LINK}/${token}`;
                    await sendEmail({
                        to: newUser.email,
                        subject: 'Account Activation',
                        text: `Please click the following link to activate your account: ${activationLink}`
                    });
                }
                // নতুন যোগ  করা এখানে শেষ


            } else {
                // Default activation
                newUser.isActivated = true;
                await userRepository.save(newUser);
            }
        }

        res.status(201).json({ message: 'ব্যবহারকারী সফলভাবে নিবন্ধিত। প্রয়োজনীয় যাচাই সম্পন্ন করুন।' });
    } catch (err) {
        res.status(500).json({ message: 'ব্যবহারকারী নিবন্ধন করতে ত্রুটি', error: err.message });
    }
};
Register User Activation Api
এর আগের টিউটোরিয়ালে আমরা একজন User রেজিস্টার করলে তাকে একটি রেজিস্ট্রেশন ইমেইল ভেরিফাই সেন্ড করেছি User ওই লিংক এ ক্লিক করলে একটি GET api কল হবে যেখানে userid এবং টোকেন এর ভিত্তিতে User এর এক্টিভেশন স্ট্যাটাস কলাম এর ভ্যালু true হওয়ার মাদ্ধমে User টি এক্টিভেট হবে।
আমাদের আগের কোড নিচের মতো ছিল শুধু রেজিস্টার করার অপশন
const jwt = require('jsonwebtoken');
const bcrypt = require('bcryptjs');
const AppDataSource = require('../config/database');
const User = require('../entities/User');
const sendEmail = require('../utils/sendEmail');
const generateOtp = require('../utils/generateOtp');

const register = async (req, res) => {
    const { username, email, password, phone } = req.body;
    const userRepository = AppDataSource.getRepository(User);

    try {
        // Check if user already exists
        const existingUser = await userRepository.findOne({ where: [{ username }, { email }, { phone }] });
        if (existingUser) {
            return res.status(400).json({ message: 'ব্যবহারকারী ইতোমধ্যে নিবন্ধিত' });
        }

        // Hash the password
        const hashedPassword = await bcrypt.hash(password, 10);
        const newUser = new User();
        newUser.username = username;
        newUser.email = email;
        newUser.password = hashedPassword;
        newUser.phone = phone;
        newUser.isActivated = false;

        // Save the new user
        await userRepository.save(newUser);

        if (email) {
            // Handle email verification
            if (process.env.EMAIL_VERIFICATION_ENABLED === 'true') {
                if (process.env.OTP_VERIFICATION_ENABLED === 'true') {
                    // Send OTP to email
                    const otp = generateOtp();
                    newUser.otp = otp;
                    await userRepository.save(newUser);

                    await sendEmail({
                        to: newUser.email,
                        subject: 'OTP for Registration',
                        text: `Your OTP is ${otp}. Use this code to complete your registration.`
                    });
                }


               // নতুন যোগ  করা
                else {
                    // Send activation email
                    const token = jwt.sign({ id: newUser.id }, process.env.JWT_SECRET, { expiresIn: '1h' });
                    const activationLink = `${process.env.EMAIL_VERIFY_ACTIVATION_LINK}/${token}`;
                    await sendEmail({
                        to: newUser.email,
                        subject: 'Account Activation',
                        text: `Please click the following link to activate your account: ${activationLink}`
                    });
                }
                // নতুন যোগ  করা এখানে শেষ


            } else {
                // Default activation
                newUser.isActivated = true;
                await userRepository.save(newUser);
            }
        }

        res.status(201).json({ message: 'ব্যবহারকারী সফলভাবে নিবন্ধিত। প্রয়োজনীয় যাচাই সম্পন্ন করুন।' });
    } catch (err) {
        res.status(500).json({ message: 'ব্যবহারকারী নিবন্ধন করতে ত্রুটি', error: err.message });
    }
};
এবার আমরা এক্টিভেশন api এর কোড অ্যাড করবো
//src/controllers/authController.js

const jwt = require('jsonwebtoken');
const bcrypt = require('bcryptjs');
const AppDataSource = require('../config/database');
const User = require('../entities/User');
const sendEmail = require('../utils/sendEmail');

const register = async (req, res) => {
    const { username, email, password, phone } = req.body;
    const userRepository = AppDataSource.getRepository(User);

    try {
        // Check if user already exists
        const existingUser = await userRepository.findOne({ where: [{ username }, { email }, { phone }] });
        if (existingUser) {
            return res.status(400).json({ message: 'ব্যবহারকারী ইতোমধ্যে নিবন্ধিত' });
        }

        // Hash the password
        const hashedPassword = await bcrypt.hash(password, 10);
        const newUser = new User();
        newUser.username = username;
        newUser.email = email;
        newUser.password = hashedPassword;
        newUser.phone = phone;
        newUser.isActivated = false;

        // Save the new user
        await userRepository.save(newUser);

        if (email) {
            // Handle email verification
            if (process.env.EMAIL_VERIFICATION_ENABLED === 'true') {
                if (process.env.OTP_VERIFICATION_ENABLED === 'true') {
                    // Send OTP to email
                    const otp = generateOtp();
                    newUser.otp = otp;
                    await userRepository.save(newUser);

                    await sendEmail({
                        to: newUser.email,
                        subject: 'OTP for Registration',
                        text: `Your OTP is ${otp}. Use this code to complete your registration.`
                    });
                } else {
                    // Send activation email
                    const token = jwt.sign({ id: newUser.id }, process.env.JWT_SECRET, { expiresIn: '1h' });
                    const activationLink = `${process.env.EMAIL_VERIFY_ACTIVATION_LINK}/${token}`;
                    await sendEmail({
                        to: newUser.email,
                        subject: 'Account Activation',
                        text: `Please click the following link to activate your account: ${activationLink}`
                    });
                }
            } else {
                // Default activation
                newUser.isActivated = true;
                await userRepository.save(newUser);
            }
        }

        res.status(201).json({ message: 'ব্যবহারকারী সফলভাবে নিবন্ধিত। প্রয়োজনীয় যাচাই সম্পন্ন করুন।' });
    } catch (err) {
        res.status(500).json({ message: 'ব্যবহারকারী নিবন্ধন করতে ত্রুটি', error: err.message });
    }
};


//নতুন যোগ করা controller
const activateAccount = async (req, res) => {
    const { token } = req.params;
    try {
        const decoded = jwt.verify(token, process.env.JWT_SECRET);
        const userRepository = AppDataSource.getRepository(User);

        let user = await userRepository.findOne({ where: { id: decoded.id } });
        if (!user) {
            return res.status(400).json({ message: 'Invalid activation link' });
        }

        user.isActivated = true;
        await userRepository.save(user);

        res.status(200).json({ message: 'Account activated successfully' });
    } catch (err) {
        res.status(400).json({ message: 'Invalid or expired activation link', error: err.message });
    }
};


//মোডিফাই করা লাইন
module.exports = { register, activateAccount};
এবার এক্টিভেশন route টি src/routes/authRoutes.js নামক ফাইলে যোগ করি
const express = require('express');
//মোডিফাই করা লাইন
const { register, activateAccount} = require('../controllers/authController');

const router = express.Router();

router.post('/register', register);
//নতুন যোগ করা route
router.get('/activate/:token', activateAccount);
module.exports = router;
To activate a user via Postman using the provided URL, follow these steps:
1. Open Postman:
- Launch Postman on your computer.
2. Create a New Request:
- Click on “New” in the top left corner.
- Select “Request” from the dropdown menu.
3. Set the Request Type:
- Set the request type to
GET(as theactivateendpoint in your route is defined as aGETrequest).
4. Enter the URL:
- Copy and paste the activation URL into the request URL field in Postman:
http://localhost:3000/auth/activate/eyJhbGciOiJIUzI1NiIsInR5cCI6IkpXVCJ9.eyJpZCI6NywiaWF0IjoxNzIzMzczMjE0LCJleHAiOjE3MjMzNzY4MTR9.Z4tuaWtlCktpC_mjz26voPvw5t8P4WyTb6ma1lVrJd0
phone Sent Otp Utility
মোবাইল ওটিপি (One Time Password) দিয়ে রেজিস্ট্রেশন এবং লগইন করতে হলে আমাদের কিছু অতিরিক্ত সেটআপ করতে হবে। এখানে আমি আপনাকে কিভাবে মোবাইল ওটিপি দিয়ে রেজিস্ট্রেশন এবং লগইন করা যায় তার স্টেপ-বাই-স্টেপ গাইড দিচ্ছি।
Step 1: Install Required Packages
প্রথমে, কিছু অতিরিক্ত প্যাকেজ ইনস্টল করতে হবে। এখানে আমরা twilio প্যাকেজটি ব্যবহার করবো মোবাইলে ওটিপি পাঠানোর জন্য।
npm install twilioStep 2: Update .env File
আপনার .env ফাইলে টুইলিও (Twilio) কনফিগারেশন যোগ করুন:
TWILIO_ACCOUNT_SID=your_twilio_account_sid
TWILIO_AUTH_TOKEN=your_twilio_auth_token
TWILIO_PHONE_NUMBER=your_twilio_phone_number
Step 3: Create Utility to Send OTP
একটি ইউটিলিটি ফাইল তৈরি করুন যা টুইলিও দিয়ে মোবাইলে ওটিপি পাঠাবে।
src/utils/otpService.js ফাইল তৈরি করুন এবং নিম্নলিখিত কোড যোগ করুন:
const twilio = require('twilio');

const accountSid = process.env.TWILIO_ACCOUNT_SID;
const authToken = process.env.TWILIO_AUTH_TOKEN;
const client = new twilio(accountSid, authToken);

const sendSms = async (phone, otp) => {
    try {
        await client.messages.create({
            body: `Your OTP is: ${otp}`,
            from: process.env.TWILIO_PHONE_NUMBER,
            to: phone,
        });
        console.log('OTP sent successfully');
    } catch (err) {
        console.error('Error sending OTP:', err);
    }
};

module.exports = { sendSms };
Phone Register Sent Otp
Update register Method
Modify the register method to handle OTP for phone registration.
Updated src/controllers/authController.js
const jwt = require('jsonwebtoken');
const bcrypt = require('bcryptjs');
const AppDataSource = require('../config/database');
const User = require('../entities/User');
const sendEmail = require('../utils/sendEmail');
const generateOtp = require('../utils/generateOtp');
const sendSms = require('../utils/sendSms'); // Implement this function as per your SMS provider

const register = async (req, res) => {
    const { username, email, password, phone } = req.body;
    const userRepository = AppDataSource.getRepository(User);

    try {
        // Check if user already exists
        const existingUser = await userRepository.findOne({ where: [{ username }, { email }, { phone }] });
        if (existingUser) {
            return res.status(400).json({ message: 'ব্যবহারকারী ইতোমধ্যে নিবন্ধিত' });
        }

        // Hash the password
        const hashedPassword = await bcrypt.hash(password, 10);
        const newUser = new User();
        newUser.username = username;
        newUser.email = email;
        newUser.password = hashedPassword;
        newUser.phone = phone;
        newUser.isActivated = false;

        // Save the new user
        await userRepository.save(newUser);

        if (email) {
            // Handle email verification
            if (process.env.EMAIL_VERIFICATION_ENABLED === 'true') {
                if (process.env.OTP_VERIFICATION_ENABLED === 'true') {
                    // Send OTP to email
                    const otp = generateOtp();
                    newUser.otp = otp;
                    await userRepository.save(newUser);

                    await sendEmail({
                        to: newUser.email,
                        subject: 'OTP for Registration',
                        text: `Your OTP is ${otp}. Use this code to complete your registration.`
                    });
                } else {
                    // Send activation email
                    const token = jwt.sign({ id: newUser.id }, process.env.JWT_SECRET, { expiresIn: '1h' });
                    const activationLink = `${process.env.EMAIL_VERIFY_ACTIVATION_LINK}/${token}`;
                    await sendEmail({
                        to: newUser.email,
                        subject: 'Account Activation',
                        text: `Please click the following link to activate your account: ${activationLink}`
                    });
                }
            } else {
                // Default activation
                newUser.isActivated = true;
                await userRepository.save(newUser);
            }
        } else if (phone) {
            // Handle phone verification
            if (process.env.PHONE_VERIFICATION_ENABLED === 'true') {
                // Send OTP to phone
                const otp = generateOtp();
                newUser.otp = otp;
                await userRepository.save(newUser);

                await sendSms(phone, `Your OTP is ${otp}. Use this code to complete your registration.`);
            } else {
                // Default activation
                newUser.isActivated = true;
                await userRepository.save(newUser);
            }
        }

        res.status(201).json({ message: 'ব্যবহারকারী সফলভাবে নিবন্ধিত। প্রয়োজনীয় যাচাই সম্পন্ন করুন।' });
    } catch (err) {
        res.status(500).json({ message: 'ব্যবহারকারী নিবন্ধন করতে ত্রুটি', error: err.message });
    }
};
1. Register with Email
When registering with an email, you’d typically provide a username, email, and password. Here’s an example JSON request:
{
  "username": "johndoe",
  "email": "johndoe@example.com",
  "password": "securePassword123"
}
2. Register with Phone
When registering with a phone number, you’d provide a username, phone number, and password. Here’s an example JSON request:
{
  "username": "johndoe",
  "phone": "1234567890",
  "password": "securePassword123"
}
Explanation:
username: The desired username for the account.email: The user’s email address, used if registering with an email.phone: The user’s phone number, used if registering with a phone number.password: The password for the account.
OTP Verification ফাংশন
OTP যাচাইকরণের জন্য একটি ফাংশন তৈরি করুন যা ব্যবহারকারী ফোন, OTP এবং একটি কলব্যাক ফাংশন নিবে। এই কলব্যাক ফাংশনটি বিভিন্ন প্রয়োজনে ব্যবহার করা যাবে, যেমন লগইন, নিবন্ধন, বা পাসওয়ার্ড রিসেট।
src/utils/verifyOtp.js
const AppDataSource = require('../config/database');
const User = require('../entities/User');

const verifyOtp = async (contact, otp, callback) => {
    try {
        const userRepository = AppDataSource.getRepository(User);

        // Determine if contact is an email or phone number
        const query = contact.includes('@') ? { email: contact } : { phone: contact };

        // Find the user by email or phone
        const user = await userRepository.findOne({ where: query });
        if (!user) {
            return { status: 400, message: 'ব্যবহারকারী পাওয়া যায়নি' };
        }

        // OTP verification
        if (user.otp !== otp) {
            return { status: 400, message: 'অবৈধ OTP' };
        }

        // Execute callback function if OTP is valid
        const result = await callback(user);

        // Clear OTP field after successful verification
        user.otp = null;
        await userRepository.save(user);

        return result;
    } catch (err) {
        return { status: 500, message: 'OTP যাচাই করার সময় ত্রুটি', error: err.message };
    }
};

module.exports = verifyOtp;
Defining verifyOtp Callback Functions
const bcrypt = require('bcryptjs');
const AppDataSource = require('../config/database');
const User = require('../entities/User');

// Registration OTP verification callback
const registrationCallback = async (user) => {
    user.isActivated = true;
    await AppDataSource.getRepository(User).save(user);
    return { status: 200, message: 'অ্যাকাউন্ট সফলভাবে সক্রিয় করা হয়েছে।' };
};

// Login OTP verification callback
const loginCallback = async (user) => {
    const token = jwt.sign({ id: user.id }, process.env.JWT_SECRET, { expiresIn: '1h' });
    return { status: 200, message: 'লগইন সফল', token };
};

// Reset password OTP verification callback
const resetPasswordCallback = async (user, newPassword) => {
    user.password = await bcrypt.hash(newPassword, 10);
    await AppDataSource.getRepository(User).save(user);
    return { status: 200, message: 'পাসওয়ার্ড সফলভাবে রিসেট হয়েছে।' };
};

module.exports = {
    registrationCallback,
    loginCallback,
    resetPasswordCallback,
};
verifyOtpController
src\controllers\verifyOtpController.js
const verifyOtp = require('../utils/verifyOtp');
const {
    registrationCallback,
    loginCallback,
    resetPasswordCallback
} = require('../utils/otpCallbacks');

const verifyOtpController = async (req, res) => {
    const { contact, otp, params } = req.body;

    try {
        let result;

        // Call the appropriate callback based on the params value
        if (params === 'register') {
            result = await verifyOtp(contact, otp, registrationCallback);
        } else if (params === 'login') {
            result = await verifyOtp(contact, otp, loginCallback);
        } else if (params === 'reset-password') {
            const { newPassword } = req.body;
            result = await verifyOtp(contact, otp, async (user) => {
                return await resetPasswordCallback(user, newPassword);
            });
        } else {
            return res.status(400).json({ message: 'Invalid params value' });
        }

        res.status(result.status).json({ message: result.message, token: result.token || null });
    } catch (err) {
        res.status(500).json({ message: 'Error verifying OTP', error: err.message });
    }
};

module.exports = verifyOtpController;
Define Routes
Finally, let’s define the route that will use the verifyOtpController.
const express = require('express');
const verifyOtpController = require('../controllers/verifyOtpController');

const router = express.Router();

router.post('/verify-otp', verifyOtpController);

module.exports = router;
Here’s an example of how to send a request to the /verify-otp endpoint with JSON data using different scenarios:
1. For Registration OTP Verification
{
  "contact": "user@example.com",
  "otp": "123456",
  "params": "register"
}
2. For Login OTP Verification
{
  "contact": "1234567890",
  "otp": "654321",
  "params": "login"
}
3. For Reset Password OTP Verification
{
  "contact": "user@example.com",
  "otp": "789456",
  "params": "reset-password",
  "newPassword": "newSecurePassword123"
}
Testing OTP Verification with Postman:
Prepare Your Request:
- Open Postman:
- Launch Postman.
- Create a New POST Request:
- Click on “New” and select “Request”.
- Set Request Type to POST:
- Select
POSTas the HTTP method.
- Select
- Enter the Request URL:
- Enter the URL for the OTP verification endpoint. For example:
http://localhost:3000/auth/verify-otpSet Headers (Optional):
- If you need to send headers (e.g., Content-Type), set them as required.
Add Request Body:
- Go to the “Body” tab in Postman.
- Choose “raw” and set the format to “JSON”.
- Enter the JSON payload. Example:
{
  "contact": "user@example.com",
  "otp": "123456",
  "params": "register"
}
Login Without Passport
const bcrypt = require('bcryptjs');
const jwt = require('jsonwebtoken');
const AppDataSource = require('../database');
const User = require('../entities/User');
const { sendOtp } = require('../utils/otpService');

exports.login = async (req, res) => {
    const { identifier, password } = req.body;

    try {
        const userRepository = AppDataSource.getRepository(User);
        let user;

        // Regular expressions for phone and email validation
        const phoneRegex = /^\d{10}$/;
        const emailRegex = /^[^\s@]+@[^\s@]+\.[^\s@]+$/;

        if (phoneRegex.test(identifier)) {
            // Phone login
            user = await userRepository.findOne({ where: { phone: identifier } });

            if (!user || !user.isActivated) {
                return res.status(400).send('User not found or not activated.');
            }

            // Check if phone verification is enabled
            if (process.env.PHONE_VERIFICATION_ENABLED === 'true') {
                // Generate OTP and expiration time
                const otp = Math.floor(100000 + Math.random() * 900000).toString();
                const otpExpiration = new Date(Date.now() + 10 * 60000); // 10 minutes from now

                user.otp = otp;
                user.otp_expiration = otpExpiration;

                await userRepository.save(user);

                // Send OTP to phone
                await sendOtp(identifier, otp);

                return res.send('OTP sent to your phone.');
            } else {
                // If OTP verification is not required, log the user in directly
                const token = jwt.sign({ id: user.id }, process.env.JWT_SECRET, {
                    expiresIn: '1h',
                });

                return res.json({ token });
            }

        } else if (emailRegex.test(identifier)) {
            // Email login
            user = await userRepository.findOne({ where: { email: identifier } });

            if (!user || !user.isActivated) {
                return res.status(400).send('Invalid email or not activated.');
            }

            const isPasswordValid = await bcrypt.compare(password, user.password);

            if (!isPasswordValid) {
                return res.status(400).send('Invalid email or password.');
            }

            const token = jwt.sign({ id: user.id }, process.env.JWT_SECRET, {
                expiresIn: '1h',
            });

            return res.json({ token });

        } else {
            // Username login
            user = await userRepository.findOne({ where: { username: identifier } });

            if (!user || !user.isActivated) {
                return res.status(400).send('Invalid username or not activated.');
            }

            const isPasswordValid = await bcrypt.compare(password, user.password);

            if (!isPasswordValid) {
                return res.status(400).send('Invalid username or password.');
            }

            const token = jwt.sign({ id: user.id }, process.env.JWT_SECRET, {
                expiresIn: '1h',
            });

            return res.json({ token });
        }
    } catch (err) {
        res.status(500).send('Error logging in user.');
    }
};
Create Routes for Authentication
Create a routes file named authRoutes.js in the routes directory.
routes/authRoutes.js
//src/routes/authRoutes.js

const express = require('express');
const router = express.Router();
const { login } = require('../controllers/authController');
const passport = require('../config/passport');

// Login route for email, username, or phone
router.post('/login', login);

module.exports = router;
Protect Routes with JWT
Create a middleware to protect your routes using JWT authentication.
middlewares/authMiddleware.js
const jwt = require('jsonwebtoken');

const jwtAuth = (req, res, next) => {
  const token = req.headers.authorization && req.headers.authorization.split(' ')[1];

  if (!token) {
    return res.status(401).json({ message: 'No token provided' });
  }

  jwt.verify(token, process.env.JWT_SECRET, (err, decoded) => {
    if (err) {
      return res.status(401).json({ message: 'Token is not valid' });
    }

    req.user = decoded; // Save the decoded user info in the request
    next();
  });
};

module.exports = jwtAuth;
Configure Express Application
Now, integrate everything in your main Express application file.
app.js or index.js
const express = require('express');
const passport = require('./config/passport');
const authRoutes = require('./routes/authRoutes');
const jwtAuth = require('./middlewares/authMiddleware');
require('dotenv').config();

const app = express();

app.use(express.json());
app.use(passport.initialize());

// Authentication routes
app.use('/api/auth', authRoutes);

// Example of a protected route
app.get('/api/protected', jwtAuth, (req, res) => {
  res.json({ message: 'This is a protected route', user: req.user });
});

const PORT = process.env.PORT || 5000;
app.listen(PORT, () => console.log(`Server running on port ${PORT}`));
Protect Routes with Custom JWT Middleware:
// প্রয়োজনীয় প্যাকেজগুলো ইমপোর্ট করছি
const jwt = require('jsonwebtoken'); // JWT যাচাইয়ের জন্য
const User = require('../entities/User'); // ব্যবহারকারীর তথ্য পাওয়ার জন্য User মডেল

// মিডলওয়্যার ফাংশন যা রুটগুলো রক্ষা করতে ব্যবহৃত হয়
const authenticateJWT = async (req, res, next) => {
    // Authorization হেডার থেকে টোকেন এক্সট্রাক্ট করছি
    const token = req.headers.authorization &&
                  req.headers.authorization.split(' ')[1];
                  // এখানে আমরা Authorization হেডার চেক করছি
                  // তারপর split(' ') করে স্পেস দিয়ে টোকেন বের করছি
                  // যেমন "Bearer <your-jwt-token>" হলে, এটি "<your-jwt-token>" বের করবে

    // যদি টোকেন না থাকে, তাহলে 401 (Unauthorized) রেসপন্স দিবো
    if (!token) {
        return res.status(401).json({ message: 'No authentication token provided.' });
        // বার্তা পাঠাচ্ছে যে কোন অ্যান্থেন্টিকেশন টোকেন প্রদান করা হয়নি
    }

    try {
        // টোকেন যাচাই করছি সিক্রেট কির মাধ্যমে
        const decoded = jwt.verify(token, process.env.JWT_SECRET);
        // JWT.verify() ফাংশন টোকেন যাচাই করে এবং ডিকোড করে

        // টোকেন দ্বারা নির্ধারিত ব্যবহারকারী খুঁজছি
        const user = await User.findOne({ where: { id: decoded.id } });
        // ডিকোড করা টোকেন থেকে ব্যবহারকারীর আইডি নিয়ে ব্যবহারকারী খুঁজছি

        // যদি ব্যবহারকারী না থাকে, তাহলে 401 (Unauthorized) রেসপন্স দিবো
        if (!user) {
            return res.status(401).json({ message: 'Invalid authentication token.' });
            // বার্তা পাঠাচ্ছে যে টোকেনটি অবৈধ
        }

        // রিকোয়েস্ট অবজেক্টে ব্যবহারকারী যোগ করছি
        req.user = user;
        // রিকোয়েস্ট অবজেক্টে ব্যবহারকারী সংরক্ষণ করছি যাতে পরবর্তী মিডলওয়্যার বা রাউট হ্যান্ডলারে ব্যবহার করা যায়

        // পরবর্তী মিডলওয়্যার বা রাউট হ্যান্ডলার এ যেতে বলছি
        next();
        // এই ফাংশনটি পরবর্তী ফাংশনে পাস করে দিয়ে রিকোয়েস্ট প্রসেস করতে সাহায্য করে
    } catch (err) {
        // যদি কোনো ত্রুটি ঘটে, তাহলে 403 (Forbidden) রেসপন্স দিবো
        return res.status(403).json({ message: 'Token is invalid or expired.', error: err.message });
        // বার্তা পাঠাচ্ছে যে টোকেনটি অবৈধ অথবা মেয়াদ উত্তীর্ণ
    }
};

// মিডলওয়্যার এক্সপোর্ট করছি যাতে অন্যান্য ফাইল থেকে ব্যবহার করা যায়
module.exports = authenticateJWT;
কোডের বিস্তারিত ব্যাখ্যা:
- প্যাকেজ ইমপোর্ট:
jwtপ্যাকেজটি JWT যাচাই করার জন্য ব্যবহৃত হয়।Userমডেলটি ব্যবহারকারীর তথ্য পেতে ব্যবহৃত হয়।
- টোকেন এক্সট্রাকশন:
req.headers.authorizationহেডার থেকে টোকেনটি পাওয়া হচ্ছে।split(' ')[1]টোকেনটিকে “Bearer” শব্দ থেকে আলাদা করে এক্সট্রাক্ট করছে।
- টোকেন যাচাই:
jwt.verify()ফাংশনটি টোকেনটিকে সিক্রেট কির মাধ্যমে যাচাই করে।
- ব্যবহারকারী যাচাই:
- টোকেনের সাহায্যে ব্যবহারকারী তথ্য খুঁজে বের করা হচ্ছে।
- ব্যবহারকারী অবজেক্ট সংরক্ষণ:
req.userএ ব্যবহারকারী সংরক্ষণ করা হচ্ছে যাতে এটি পরবর্তী মিডলওয়্যার বা রাউট হ্যান্ডলার থেকে অ্যাক্সেস করা যায়।
- ত্রুটি পরিচালনা:
- যদি টোকেন যাচাইয়ে কোনো ত্রুটি ঘটে, তাহলে 403 (Forbidden) রেসপন্স প্রদান করা হচ্ছে।
এই মিডলওয়্যারটি আপনার অ্যাপ্লিকেশনকে JWT ভিত্তিক অথেন্টিকেশন প্রক্রিয়ায় সহায়তা করবে। আশা করি এই ব্যাখ্যা আপনাকে বুঝতে সাহায্য করবে!
ব্যবহার:
এই authenticateJWT মিডলওয়্যারটি ব্যবহার করে রুটগুলো সুরক্ষিত করা যায়। উদাহরণস্বরূপ:
const express = require('express');
const authenticateJWT = require('./middlewares/authenticateJWT');
const app = express();

// সুরক্ষিত রুট
app.get('/protected-route', authenticateJWT, (req, res) => {
    res.send('This is a protected route');
});
Google OAuth client ID
Create a New Google Cloud Project
- Sign In: Go to the Google Cloud Console and sign in with your new Gmail account.
- Create Project:
- Click on the project drop-down menu at the top of the page next to the Google Cloud logo.
- Click on “New Project”.
- Enter a project name (e.g.,
My New Project). - Select a billing account if prompted (you might need to set up a billing account if you haven’t already).
- Click “Create”.
2. Set Up OAuth 2.0 Credentials
- Navigate to Credentials:
- In the Google Cloud Console, go to the API & Services > Credentials section.
- Create OAuth 2.0 Credentials:
- Click on “Create Credentials” and select “OAuth client ID”.
- You might need to configure the OAuth consent screen before creating OAuth credentials. If prompted, follow the steps to set it up.
- Configure OAuth Client ID:
- Application Type: Select “Web application”.
- Name: Enter a name for your OAuth client (e.g.,
My Web App Client). - Authorized JavaScript Origins: Enter the origin of your application (e.g.,
http://localhost:3000for development orhttps://www.example.comfor production). - Authorized Redirect URIs: Enter the URI where Google will redirect users after authentication (e.g.,
http://localhost:3000/auth/google/callbackfor development orhttps://www.example.com/auth/google/callbackfor production). - Click “Create”.
- Obtain Client ID and Client Secret:
- After creating the OAuth 2.0 client ID, you will be shown the Client ID and Client Secret. These are needed for configuring your application.
3. Configure Your Application
- Environment Variables: Store the
GOOGLE_CLIENT_IDandGOOGLE_CLIENT_SECRETin your application’s environment variables or configuration files. - Implement Google Authentication:
- Use the
Client IDandClient Secretin your application’s code to configure the OAuth 2.0 strategy with Passport.js or any other authentication library you are using.
- Use the
{"web":{"client_id":"156159092577-n9fc6n1de6ir9s18k9gglvrc8q827m8u.apps.googleusercontent.com","project_id":"social-login-428813","auth_uri":"https://accounts.google.com/o/oauth2/auth","token_uri":"https://oauth2.googleapis.com/token","auth_provider_x509_cert_url":"https://www.googleapis.com/oauth2/v1/certs","client_secret":"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","redirect_uris":["http://localhost:3000/auth/google/callback"],"javascript_origins":["http://localhost:3000"]}}Passport Google Login
First, ensure you have the necessary packages installed:
npm install passport passport-google-oauth20 passport-jwt
# Google Login Setup
GOOGLE_CLIENT_ID="156159092577-n9fc6n1de6ir9s18k9gglvrc8q827m8u.apps.googleusercontent.com"
GOOGLE_CLIENT_SECRET="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"
Configure Google Strategy
Create a new file passport-setup.js to configure Passport strategies:
const passport = require('passport');
const GoogleStrategy = require('passport-google-oauth20').Strategy;
const JWTStrategy = require('passport-jwt').Strategy;
const ExtractJWT = require('passport-jwt').ExtractJwt;
const { getRepository } = require('typeorm');
const User = require('../entities/User');

// Import the AppDataSource configuration
const AppDataSource = require('../config/database');

const jwtSecret = process.env.JWT_SECRET;

// Google OAuth Strategy
passport.use(new GoogleStrategy({
  clientID: process.env.GOOGLE_CLIENT_ID,
  clientSecret: process.env.GOOGLE_CLIENT_SECRET,
  callbackURL: "/auth/google/callback",
}, async (accessToken, refreshToken, profile, done) => {
  try {
    const userRepository = AppDataSource.getRepository(User);

    const existingUser = await userRepository.findOne({ where: { googleId: profile.id } });
    if (existingUser) {
      return done(null, existingUser);
    }

    const newUser = userRepository.create({
      googleId: profile.id,
      email: profile.emails[0].value,
      username: profile.displayName,
    });
    await userRepository.save(newUser);
    done(null, newUser);
  } catch (err) {
    done(err, false);
  }
}));

// JWT Strategy
passport.use(new JWTStrategy({
  jwtFromRequest: ExtractJWT.fromAuthHeaderAsBearerToken(),
  secretOrKey: jwtSecret,
}, async (jwtPayload, done) => {
  try {
    const userRepository = AppDataSource.getRepository(User);
    const user = await userRepository.findOne({ where: { id: jwtPayload.id } });
    if (!user) {
      return done(null, false);
    }
    done(null, user);
  } catch (err) {
    done(err, false);
  }
}));

passport.serializeUser((user, done) => {
  done(null, user.id);
});

passport.deserializeUser(async (id, done) => {
  try {
    const userRepository = AppDataSource.getRepository(User);
    const user = await userRepository.findOne({ where: { id } });
    done(null, user);
  } catch (err) {
    done(err, null);
  }
});